

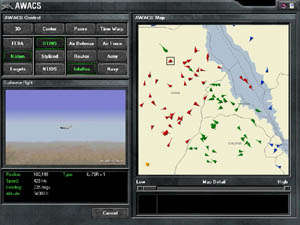
The AWACS command and control platform patrols high above the allied battlespace. This is the communications nerve centre: alive with the chatter of allied forces intercepting, refuelling and dogfighting.
At first the AWACS may seem intimidating: red, green and blue triangles swarming over the stylized Red Sea map. But delve deeper and you will gain valuable insight into the structure of the air battle raging outside. You can monitor allied forces as they Scramble from airbases to intercept inbound bogies. You can reposition your defences: CAP flights patrolling high over your borders and high value static targets. Reply to flights on Bingo fuel by directing them to a friendly airbase or airborne refueller. In this section, we will try to draw your attention to the tricks of AWACS gameplay: how to command the war to win the war.
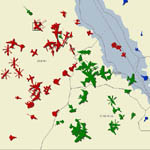
The first thing you want to do is get a quick appraisal of what is where across theatre. Selecting Stylized from the AWACS interface will switch the simple notation we use for representing airborne flight of aircraft to a small image representing the type of aircraft that flight contains.
For example, here we can see that many of the aircraft in central Sudan are in fact helicopters. Although they may pose a threat to strike flights, they are no threat to our nation defenses so we can quickly disregard them.
We can also see immediately that our AWACS is close to the enemy border. It may be wise to move it deeper into allied territory straight away - if you lose your AWACS you will be blinded. You will find winning the war a whole different challenge without your greatest ally, your AWACS
Now you have identified where your aircraft are, you should look at where it is they are going: are they flying deep into enemy territory or patrolling along friendly borders.
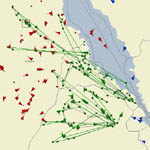
Selecting Routes will overlay all the allied waypoint routes onto the stylized map in the AWACS interface. Immediately you will see the air corridors through which your resources are passing. As you look at these routes, remember the Losses hot spots you viewed in the War Room. Are your missions flying into trouble?

Overlaying the EWR and airbase radar circles shows clearly that your forces are trying to avoid being detected. However, as the hot spot data showed us previously, our forces are being picked off in the air corridors between the radar sites.
Note also how the enemy have repositioned their airborne defences to defend the spaces in between their EWR and Scramble cover. You are going to have to be clever to outwit your adversary.
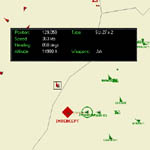
As the EWR sites detect, allies vis-ident and ground based stations identify enemy aircraft, so the information they obtain is uplinked to the AWACS. This means that all the information you need to decide if a flight provides a threat is at your fingertips.
In this case, we know the the Su-27 is carrying Air-to-Air weapons. With knowledge of the plane type, the weapons it's carrying and its altitude (look in the 3D map mode for this information) - you should be able to deduce its role in theatre.


